 Save to Pinterest
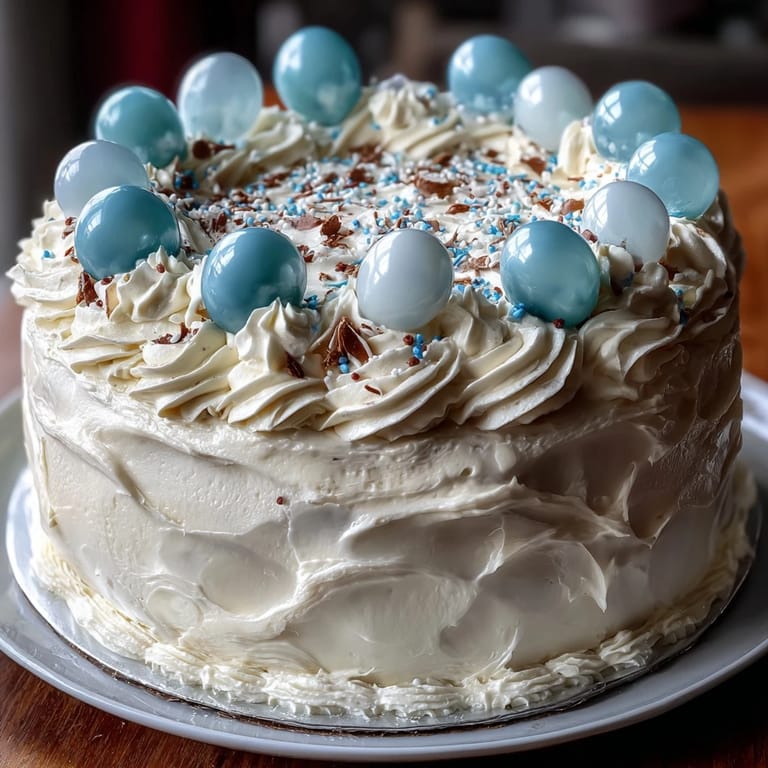
 My cousin texted me the day before her graduation with panic in her voice—she'd ordered a cake that fell through, and suddenly I was volunteering to bake one overnight. Standing in my kitchen at midnight, I realized I didn't just need to make a cake; I needed to make something that said congratulations in buttercream and layers. This two-tier vanilla cake with its playful balloon toppers became that celebration, and honestly, it turned out to be the moment I understood why people stress-bake for people they love.
What I didn't expect was how my nephew would sneak into the kitchen at 2 a.m. to watch me stack those tiers, asking a hundred questions about why the dowels mattered and whether balloons could really go on top of frosting. He ended up being my sous chef, and we finished decorating together as the sun came up, both of us covered in buttercream and giddy with the kind of tired that only happens when you're doing something that matters.
Ingredients
- All-purpose flour (4 1/2 cups): The foundation of your sponge—make sure it's measured by spooning and leveling, not scooping straight from the bag, or you'll end up with dense cake.
- Baking powder (3 1/2 tsp): This is what gives you those tender crumbs; don't skip it or reduce it.
- Salt (1/2 tsp): A tiny pinch that makes the vanilla sing and balances the sweetness.
- Granulated sugar (2 1/2 cups): Creamed with butter, it aerates the batter and keeps the cake light.
- Unsalted butter (1 1/2 cups plus 2 cups for frosting): Room temperature is non-negotiable; cold butter won't cream properly and you'll lose volume.
- Large eggs (8): Room temperature eggs incorporate better and create a finer crumb structure.
- Pure vanilla extract (2 tbsp plus 2 tbsp): Real vanilla makes a noticeable difference; the imitation stuff tastes thin by comparison.
- Whole milk (2 cups for cake, 1/2 cup for frosting): Room temperature milk blends seamlessly into the batter without shocking the temperature.
- Powdered sugar (8 cups): Sift it before using or you'll have lumps in your frosting that no amount of beating will fix.
- Gel food coloring (optional): Gel holds color better than liquid and won't thin out your frosting.
- Balloon cake toppers: These are the visual punch that makes people smile the moment they see the cake.
Tired of Takeout? 🥡
Get 10 meals you can make faster than delivery arrives. Seriously.
One email. No spam. Unsubscribe anytime.
Instructions
- Prepare your pans and preheat:
- Set your oven to 350°F and line both your 8-inch and 6-inch pans with parchment paper—grease it first so the paper sticks. This step takes two minutes but saves you from cake disasters.
- Combine your dry ingredients:
- Whisk flour, baking powder, and salt together in a medium bowl; this distributes the leavening evenly throughout the batter. Set it aside and don't rush this part.
- Cream butter and sugar until fluffy:
- Beat them together for 3 to 5 minutes until the mixture goes pale and light—this is where you're building volume. If you skip this step by beating for only a minute, your cake will be dense no matter what else you do right.
- Add eggs one at a time:
- Beat well after each egg addition; this helps them incorporate fully rather than sitting as little yellow pockets in your batter. It takes patience, but it matters.
- Mix in vanilla extract:
- Stir it in after the eggs are fully combined, and take a breath—the batter is starting to smell amazing at this point.
- Alternate flour and milk in three additions:
- Start with flour, then milk, then flour, ending with flour; this prevents the batter from breaking and keeps it smooth. Use low speed and mix only until you don't see streaks of flour anymore.
- Divide batter between pans:
- Pour equal amounts into each pan size so your tiers bake evenly. Tap the pans gently on the counter to release any big air bubbles trapped inside.
- Bake the 8-inch cakes:
- They'll take 35 to 40 minutes; your kitchen will smell like pure vanilla heaven. Insert a toothpick in the center—when it comes out clean or with just a crumb or two, they're done.
- Bake the 6-inch cakes:
- These smaller layers bake faster, around 25 to 30 minutes, so check them first even if you're baking everything at once on different racks.
- Cool in pans then on racks:
- Let them rest for 10 minutes in the pans so they set slightly, then turn them out onto wire racks to cool completely. This takes about an hour, and yes, you have to wait.
- Make your buttercream frosting:
- Beat softened butter until it's creamy, then gradually add sifted powdered sugar while beating—this prevents lumps. Add vanilla, salt, and milk a tablespoon at a time until the frosting reaches a smooth, spreadable consistency.
- Tint with gel food coloring if using:
- A tiny drop goes a long way with gel coloring, so add slowly and beat well between additions. If you're using school colors, mix two shades together for something unique.
- Level and layer the 8-inch cakes:
- If your cakes domed on top, use a serrated knife or cake leveler to trim them flat. Place one layer on your cake board, spread buttercream on top, then place the second layer.
- Layer the 6-inch cakes the same way:
- Frost between the two layers, keeping the stack neat so it sits flush when you place it on top of the larger tier.
- Apply a crumb coat to both tiers:
- Spread a thin layer of buttercream over each cake to seal in crumbs, then refrigerate for 20 minutes. This step feels tedious but prevents those annoying crumbs from showing up in your final frosting.
- Frost the cakes smoothly:
- Use an offset spatula and an icing turntable if you have one, working in a cool kitchen so the frosting doesn't get too soft. A warm room means soft frosting means a messy cake, so time this carefully.
- Stack the tiers with dowels:
- Place the 6-inch cake centered on top of the 8-inch cake, using dowels or straws inserted into the bottom tier for support—this prevents the top from sinking. Mark where they go with a toothpick first, then press them in gently.
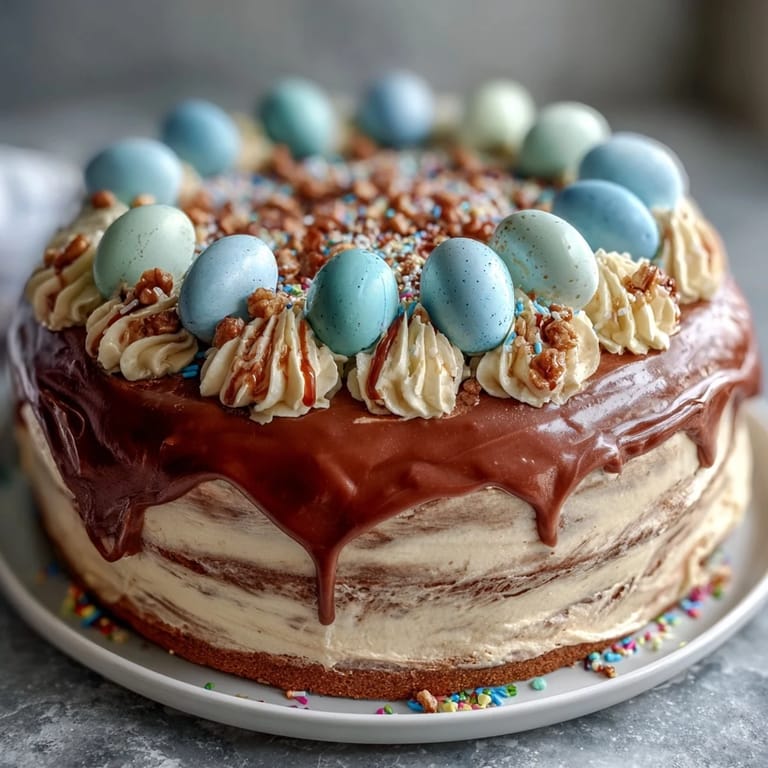
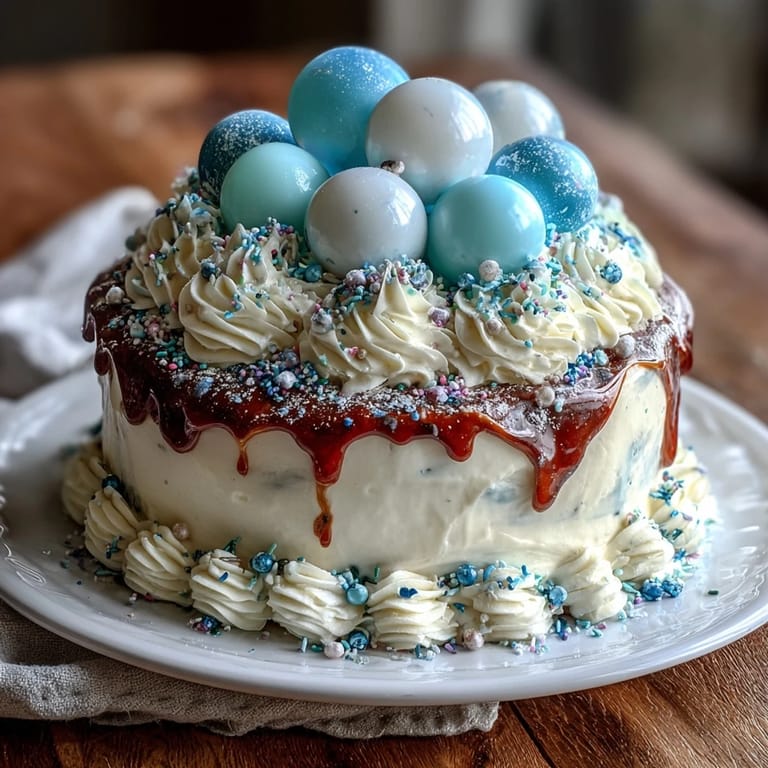
- Decorate with balloon toppers and confetti:
- Position your balloon toppers carefully, letting them lean slightly so they look celebratory rather than stiff. Add edible confetti or sprinkles around the base of the top tier for extra festive energy.
 Save to Pinterest
 The moment that cake left my kitchen for the graduation party, I realized I'd created something beyond dessert—it was a gift that showed up, looked beautiful, and tasted like someone had cared enough to stay up all night. That's what this cake does every single time.
Why Two Tiers Matter
A single-layer cake feels casual, but two tiers automatically look like you planned something important. The visual impact of stacking them is why people take photos before they cut into the first slice, and why your graduate will remember not just eating it but seeing it wheeled out to the celebration. The bigger bottom tier holds most of the weight, which means the smaller top tier gets to be all celebration—just balloon toppers and possibility.
The Science of Staying Moist
This recipe uses a higher ratio of milk to flour than a lot of traditional cakes, which means the crumb stays tender and doesn't dry out even if you bake it the day before. The butter in the batter also helps with moisture retention, so by day two you still have soft, pleasant cake instead of the crumbly disappointment you get from some recipes. I've learned the hard way that this particular formula forgives sitting under frosting in a cool kitchen for hours, which is perfect when you're serving a crowd and can't cut into it immediately after baking.
Making This Cake Your Own
The vanilla sponge is a blank canvas, which means you can take it in a hundred directions depending on who you're celebrating. Almond extract instead of vanilla gives it a delicate, sophisticated note that pairs beautifully with the buttercream, while a teaspoon of lemon zest in the batter brings brightness that feels fresh and summery. Some people swear by adding a teaspoon of cornstarch to the flour for an even more tender crumb, and I've done it enough times to know it works—that's just a personal preference based on how soft you like your cake.
- Experiment with the frosting color weeks before the celebration so you know exactly how much gel coloring you need to match the grad's school colors.
- If you want the cake to taste different, flavored extracts like vanilla bean, almond, or even rum extract can be swapped in for part of the vanilla.
- Edible glitter lasts longer than sprinkles and won't weep color into the frosting if the cake sits for a while.
 Save to Pinterest
 This cake celebrates the person being honored and the people gathered around them, and it tastes like you believed the occasion was worth the effort. Bake it with that in mind.
Recipe Questions & Answers
- → How do I ensure the vanilla sponge stays moist?
Use room temperature ingredients and avoid overmixing. Alternating the flour and milk gradually helps maintain a tender texture.
- → What’s the best way to level cake layers?
Use a serrated knife or cake leveler to trim the domed tops evenly before assembling for stable stacking.
- → How can I achieve smooth buttercream frosting?
Beat butter until creamy before adding powdered sugar gradually. Incorporate vanilla and milk stepwise, then chill to help smooth the final coat.
- → Are balloon toppers safe to use on cakes?
Ensure balloon toppers use food-safe sticks and materials. Homemade or store-bought options should be clean and non-toxic.
- → Can I prepare this cake ahead of time?
Yes, baking and frosting can be done in advance. Chill layers well before stacking to maintain structure and freshness.